

This block began not with just one idea, but with three. The first was a continuation of my recent experiments trying to get more variations of shade by carving different textures. Escher's amazing control over gradations of tone is so far out of my league that I can't say I aimed to emulate it, but I did want to see whether I could stretch myself a little. The second idea was provided by my son P, who suggested that I needed to do a phoenix, a mythological creature of which he's very fond. (His favorite mythological beast of all is the classical chimera, a creature I've always found unconvincing at best and which I have no intention of carving. So the phoenix was an idea we could both get excited about.) Finally, the third idea was something I'd been wanting to experiment with for a while: printing with light ink on black paper. The phoenix seemed a perfect fit for that idea, so there I was: all set with a plan.
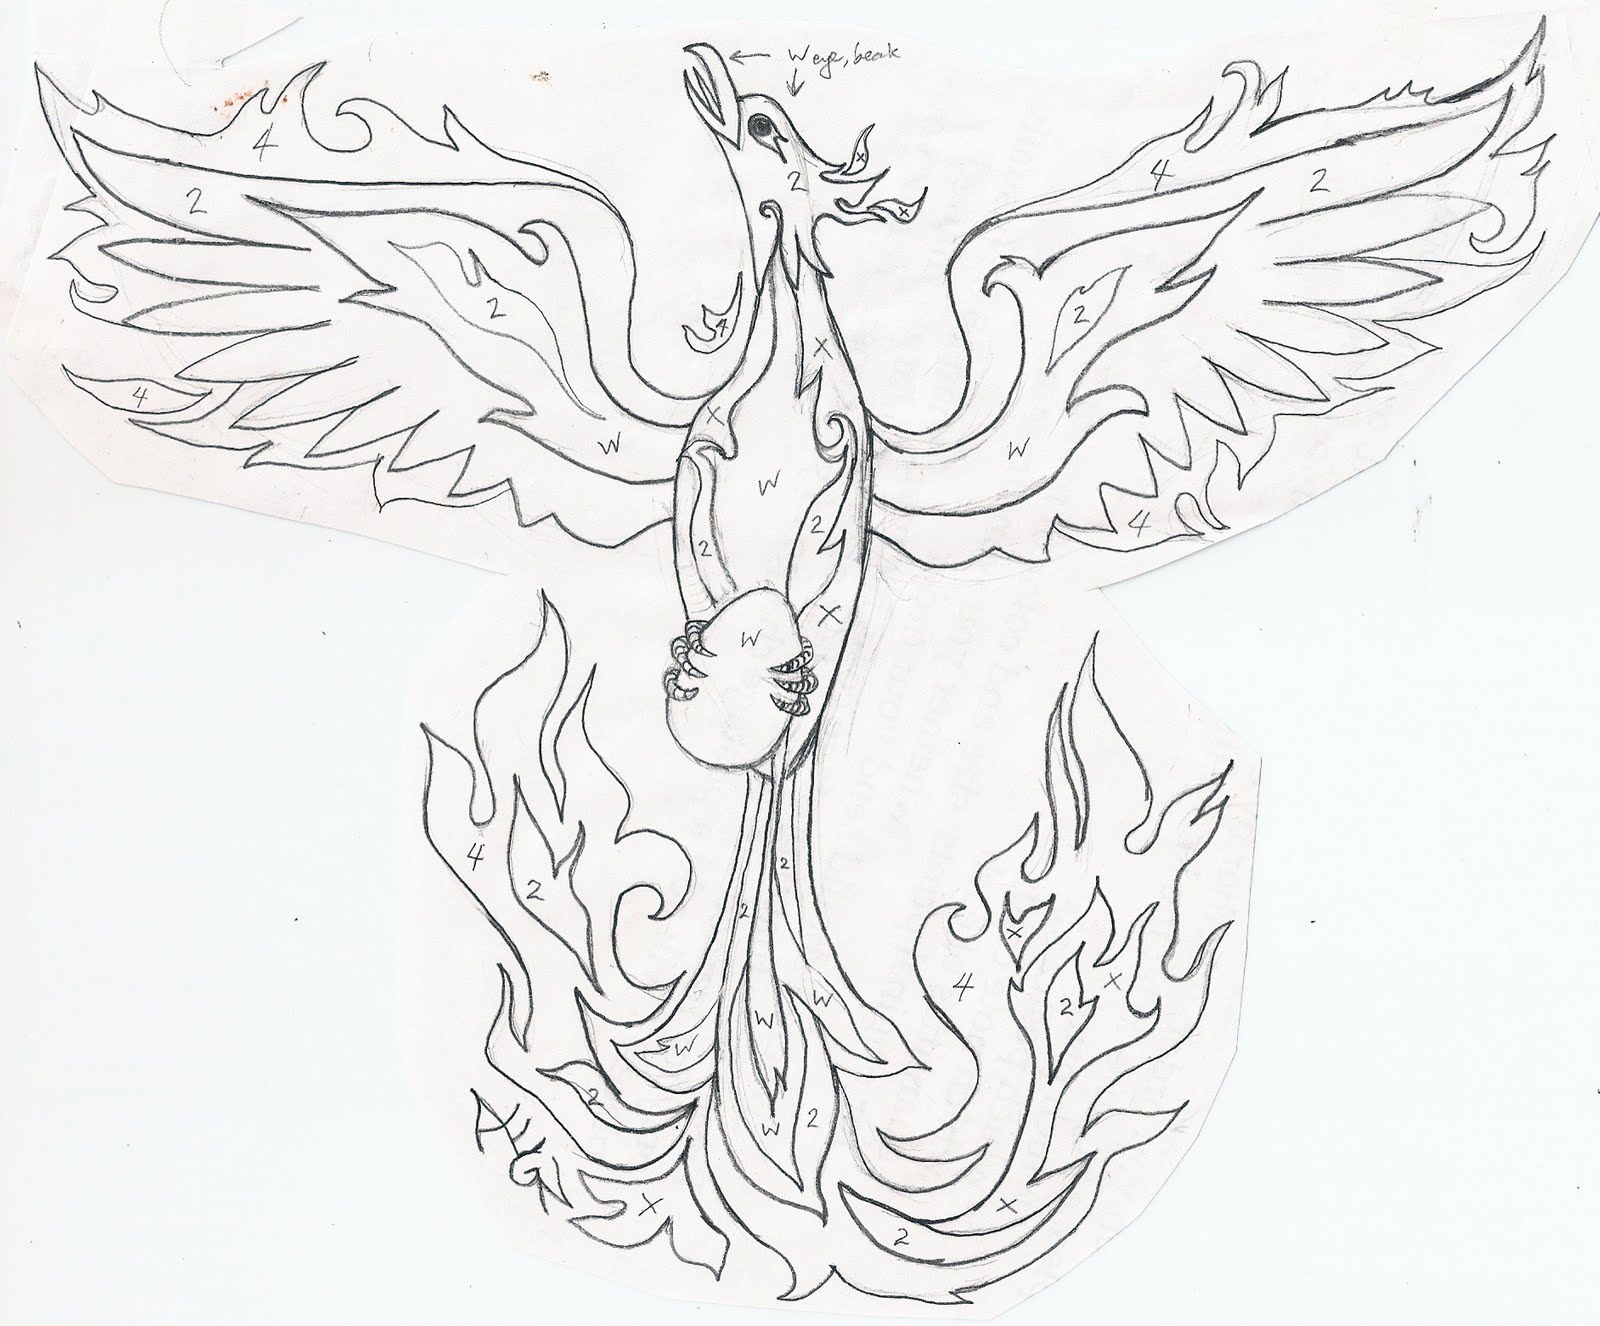 The next step was to draw the design. I sketched out some basic outlines, and embellished with all the fun swirly flame patterns. Since this isn't a real animal, I didn't work from photos or any sort of reference materials, but just doodled it all out of my imagination. This is where it's so nice to be able to draw the design on paper: I did plenty of erasing, and also taped extra paper to the edges to make more room when I decided that the wings needed to be longer. I thought I'd aim for about five different tones ranging from solid yellow ink to solid black paper, and I made notes on my design to remind myself which areas were to be which. I was definitely hoping that I was keeping my head straight as I thought about the design, because carving the lines that are to be black and leaving behind the areas that are to be lighter colored is the reverse of how block prints usually work.


I began carving on July 12, where I brought the block along for a demonstration at an Artist Talk I was giving in the evening. I carved only a little bit there, since I was mostly answering questions and talking with people, but I did get some of the main outline done.

I finished the first round of carving over the next three days, carving for an hour or two each day, split up into several shorter sittings. When I had everything carved, I used an ink pad to print a quick draft to get a sense for what the thing looked like. Of course, in the stamp pad version the light and dark were reversed from how I intended. At any rate, I thought the fourth tone in my range needed to show more paper, so I recarved all those areas, adding lots more little lines. I'm not sure my different tones really came out as I'd hoped (so much for Escher), but eventually I was satisfied enough with the over-all look, and I declared victory. Then I washed the entire block. It has to be clean for printing, but I also scrubbed a lot with a toothbrush to try to make sure that all the tiny rubber shavings were out. The rubber tends to stay attached in all the little gouges, and any little bit of rubber on the block (or dust, or cat hair…) will make a flaw in the printing. Once clean, the block just needs to dry thoroughly and it's ready to print.
That's where things screeched to a temporary halt. 1. I was waiting for the arrival of the yellow ink I ordered. 2. I wasn't sure I had enough black paper. (I'm tickled, by the way, that the paper color is called "stygian black.") I had thought I'd be able to cut 16 pieces from the sheets I bought, but then I realized they weren't quite big enough for that. So the printing had to wait for the procurement of more supplies.

On the 19th I was ready to print. My ambitious plan was to roll the block with yellow, then use daubers to apply orange and red in selected areas. It was gorgeous… except for one little problem. The yellow ink simply wasn't sufficiently opaque. It didn't look too bad when I first pulled the paper off the block, but as the ink dried, more and more black paper showed through.


After eight attempts I was forced to conclude that nothing was going to make this dank, greenish bird into the vibrant, dramatic phoenix I had envisioned. I declared defeat and turned to Plan B. In other words, I washed up everything, and settled back to wait for the block to dry thoroughly once again. By then the ravenous hordes (ie P & T) were clamoring for afternoon snack anyway.
A couple of hours later I was back, trying again with gold ink on the black paper. Definitely better; useable in fact, but still not as bright as I had hoped. I mean, this is supposed to be a phoenix, for goodness sake. I decided to try Plan C. But first, everything needed to be washed up again, and I had to wait for the block to dry thoroughly… again…
And this morning I tried once more, printing a few with the orange and red inks on white paper, and painting in the eyes and yellow flames individually. Not too bad, but definitely not what I'd envisioned, either.
So, here are the results of my grand experiment.
Hypothesis 1: yellow ink on black paper will look fiery.
Result: negative. Light ink is not opaque enough to work on dark paper.
Hypothesis 2: gold ink on black paper will look rich and dramatic.
Result: somewhat negative. The print shows clearly, but the gold is far from gleaming.
Hypothesis 3: designing a block for use on dark paper will be a cool variation.
Result: well, it might have been if the ink had shown up. But now I'm ending up printing on white paper with a block that was designed to be the opposite. And anyway, by now I'm tired of the whole darn thing.
Ah well. That's the way things go in the lab… I mean studio. But the final analysis? P the phoenix fanatic says this is my best block ever and he's thrilled that I'll frame one for his bedroom. So I guess it wasn't a complete failure after all.

[Pictures: Golden Phoenix, rubber block print by AEGN, 2010 (sold out);
process photos by AEGN, and PGNydam;
Phoenix, rubber block print by AEGN, 2010 (sold out).]
1 comment:
Anne, this print is gorgeous!!!!!!!! Love your blog...I added you onto my blog list at Penelope's.
Post a Comment